UART access. Hardware Hacking with Bus Pirate

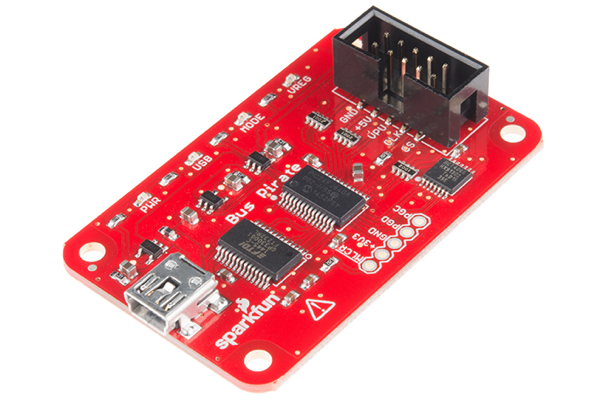
Bus Pirate is a flexible tool for hardware hacking that enables a universal bus interface that talks to most chips. It supports several protocols:
- 1-Wire
- I2C*
- SPI
- JTAG
- Asynchronous serial
- MIDI
- PC keyboard
- HD44780 LCD
- 2- and 3-wire libraries with bitwise pin control
- Scriptable binary bitbang, 1-Wire, I2C, SPI, and UART modes
Features
- 0-5.5volt tolerant pins
- 0-6volt measurement probe
- 1Hz-40MHz frequency measurement
- 1kHz - 4MHz pulse-width modulator, frequency generator
- On-board multi-voltage pull-up resistors
- On-board 3.3volt and 5volt power supplies with software reset
- Macros for common operations
- Bus traffic sniffers (SPI, I2C)
- A bootloader for easy firmware updates
- Transparent USB->serial mode
- 10Hz-1MHz low-speed logic analyzer
- Servo driver
- Can program many AVR microcontrollers
- Supported by AVRdude
- Can emulate the AVR STK500 v2 with alternate ST500 Clone firmware
- Programs FPGAs and CPLDs with alternate XSVF firmware
- Scriptable from Perl, Python, etc.
- Translations (currently Spanish and Italian)
- Public domain (Creative Commons Zero) source. Prototype with the Bus Pirate, then use the code in your project however you want.
If we are able to identify a UART pinout in a board, we can try to connect to it with BusPirate.
Using the following table we will be able to connect the BusPirate to the target device:
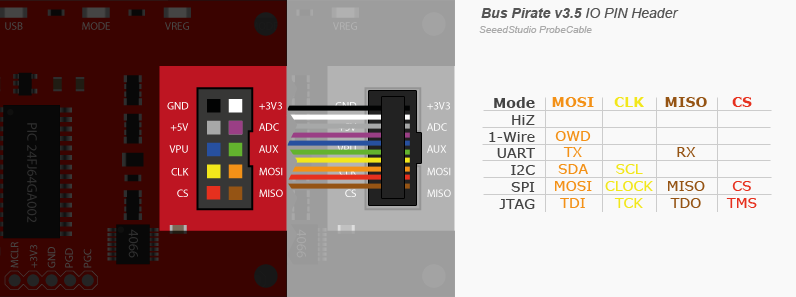
Once we connect the bus pirate to the pins in your board and set up your terminal software to connect (baud rate is 115200), you will see the HiZ> prompt. If you don’t see it, just press [enter].
Okay, now we will switch to UART mode, we will press m:
HiZ> m
1. HiZ
2. 1-WIRE
3. UART
4. I2C
5. SPI
6. 2WIRE
7. 3WIRE
8. KEYB
9. LCD
x. exit(without change)

(1)>
Now you will press 3 for UART, and you will need to set up the serial port speed (bps), data bits, parity, stop bits, polarity, and voltage (output type) of the device you want to connect to.
Warning, if your device supports up to 3 volts, and you feed it with 5 volts is more than probable that you will burn it.
Now the prompt changed to UART>. Enter “(0)” to show available macros:
UART>(0)

0.Macro menu
1.Transparent bridge
2.Live monitor
3.Bridge with flow control
Now enter “(3)” to enter bridge mode with flow control and the terminal will receive input from your device.
At this moment you may have a shell or access to boot loader (maybe you can try to boot the kernel with single or init=/bin/bash).
Happy hacking!!